DIY Bee Habitat
Most wild bee species are solitary. About two-thirds of solitary nesting bees use tunnels in the ground, while one-third use hollowed-out plant stems or tunnels in fallen branches. There are a variety of ways to create nesting places in your area. I am going to show you how to make a bee habitat out of wood to hang from a tree.
Youtube Video Link

Supplies:
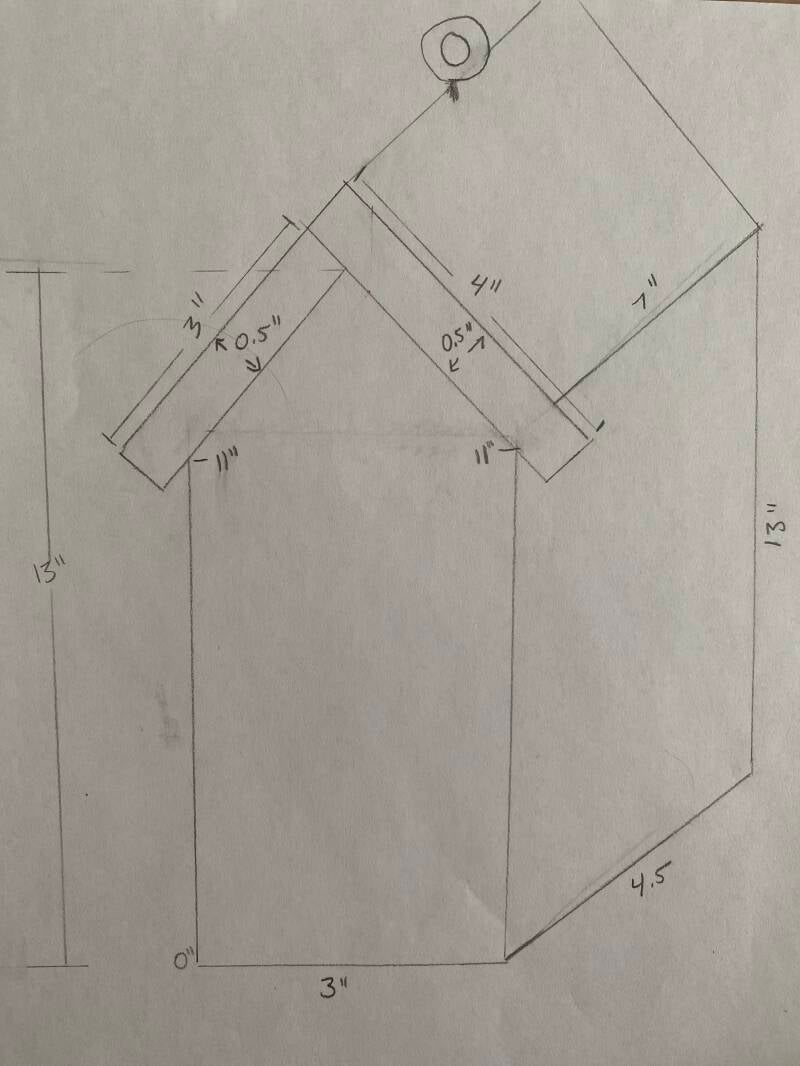
- 1 Block of Untreated/Unpainted Wood (13"x3"x4.5")
- 1 Wood for Backing (13"x3"x 0.5")
- 1 Wood for Left Side of Roof (7"x3"x0.5")
- 1 Wood for Right Side of Roof (7"x4"x0.5")
- Screws (#5 x 1" Exterior Flathead Screws)
- Drill Press and/or Hand Drill
- Drill Bits (Sizes: 3/8", 5/16", 1/4")
- Handheld Propane Torch
- Safety glasses
- Optional - 1 Hanging hardware (7/32" x 2-3/16" Stainless Steel Lag Screw Eye)
- wire
- Block of Wood - you will need one block of untreated unpainted wood that is 13" length x 3" width x 4.5" depth.
- The Backing - you will need one piece of wood that is 13" length x 3" width x 0.5" depth. (The backing is screwed on and will be removable to do your annual cleaning of the holes for new bees to nest in)
- The Roof - you will need one piece of wood that is 7" length x 3" width x 0.5" depth for the left side and you will need one piece of wood that is 7" length x 4" width x 0.5" depth for the right side of the roof. The slope of the roof is angled to keep water and snow from accumulating in the bee habitat.
- Drilling the holes – the blocks should be secured in a vise and all holes drilled using a portable drill and a bit. You will need to drill different size holes for the different size bees. (You can also use bamboo sticks instead of drilling holes). I recommend spacing your holes about ¾” apart and you should drill holes varying in sizes – 2mm to 10mm. Holes are drilled completely through the block to facilitate annual cleaning.
- Sanding - Sand the block of wood after drilling the holes to give it a smooth appearance.
- Adding the Roof - Next step is to pre-drill your holes. I added 3 screws to each left and right side of the roof.
- Charring/Weatherproofing - the charring will weatherproof the habitat, as well as the darkened surface is more attractive to nesting females. Slightly burn/char all sides of the habitat by using a propane torch. Remember to wear safety glasses. This is a messy process, so be prepared to get black fingers and wear old clothes.
- Adding Hanging Hardware (Optional) -
- Maintenance - is often overlooked, but routine maintenance is essential. If you don’t clean and maintain your bee habitat, it can harbor pests, diseases, mold, ant infestations & spider webs. Throughout the summer, monitor your habitats and in the winter after the bees moved out, clean out the holes for new bees in the spring.
The Bee Habitats I added to our community are located around Schwarz Pond Trail behind the Rosemount High School & Baseball Field in downtown Rosemount
Create Your Own Website With Webador